Have you created an amazing Android app and are wondering how to get it out to the world? The Google Play Store is the gateway for millions of Android users to discover new apps, and it’s the perfect platform to launch your creation. Whether you’ve built a game, a productivity tool, or something unique, publishing an app to Google Play can open your app up to a massive audience.
In this guide, we’ll walk you through the entire process step-by-step, from setting up your developer account to uploading your app and getting it reviewed by Google. By the end, you’ll have a clear roadmap for how to publish your app on Google Play Store and share it with the world!
Step 1: Create a Google Developer Account
Before you publish your app on Google Play Store, you’ll need a Google Developer Account. Think of it as your official badge that says you’re ready to be a part of the Google Play community. Creating an account is pretty straightforward, and there’s a one-time registration fee ($25) to cover the costs of managing millions of apps.
Here’s how to get your developer account set up:
- Head over to https://play.google.com/console/ using your regular Google account (the one you use for Gmail or YouTube).
- You’ll see a button to “Get Started” – click on that and follow the on-screen instructions. (Select the account type, For Yourself or Your Company/organization)
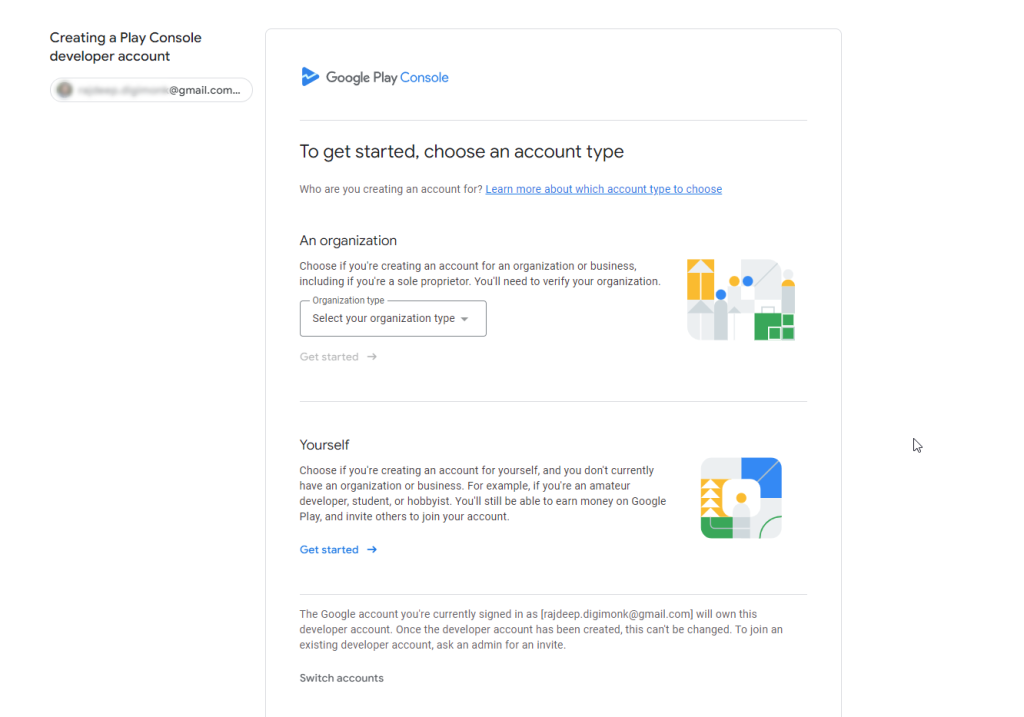
- There will be a short agreement to read and accept outlining the rules of the Play Store.
- Finally, you’ll need to pay the registration fee. It’s a small investment that unlocks a huge potential audience for your app.
Once you’ve completed these steps, your Google Developer Account will be ready to use! This account will be your central hub for managing all your apps on the Play Store.
Step 2: Add a Merchant Account
Step 2 is only necessary if you plan on making money from your app through in-app purchases or subscriptions. If your app is completely free, you can skip ahead to Step 3!
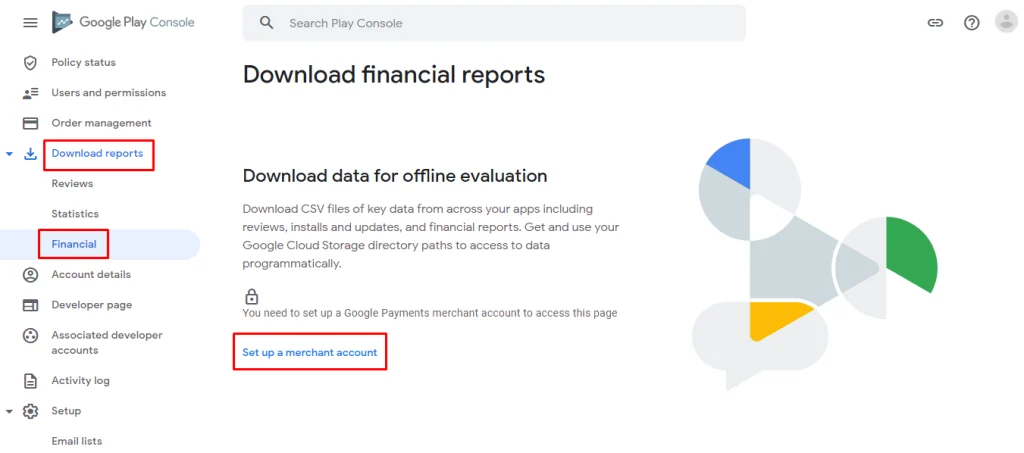
For those of you who want to offer paid features within your app, you’ll need to connect a Merchant Account to your Google Developer Account. This Merchant Account is basically your online store connected to Google Play, allowing you to securely process payments from users.
Here’s the thing: you might already have a Merchant Account set up if you use Google services like Google Pay or YouTube for paid content. If that’s the case, you can simply link your existing account to your developer profile.
But if you’re new to selling online, don’t worry! Setting up a Merchant Account is a straightforward process that Google will guide you through during the initial setup. Just make sure you have your business information handy, like your bank details and tax ID (if applicable).
Having a Merchant Account connected unlocks the ability to monetize your app, so it’s worth considering if you’ve built an app with premium features or subscriptions in mind.
Step 3: Create a Developer’s Page
A well-crafted Developer’s Page on Google Play can be a powerful tool to showcase your brand, establish trust with users, and ultimately drive more downloads for your apps. Here’s a breakdown of the key elements to consider when creating your page:
Content:
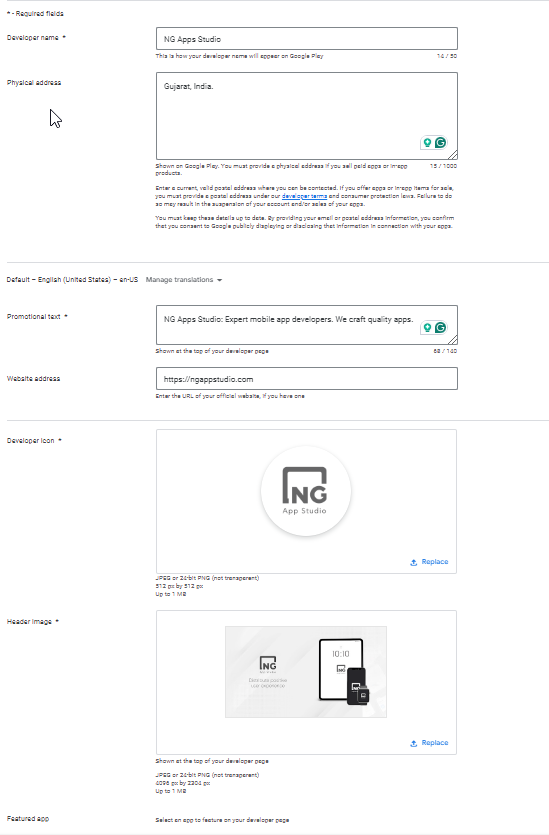
- Developer Name: This should be your studio name or your individual developer name, depending on how you brand yourself.
- Physical Address: Including your physical address is optional, but it can add a touch of legitimacy and professionalism to your page.
- Promotional Text: This is your chance to tell users a bit about yourself or your studio. Briefly describe your development philosophy, what kind of apps you create, and what makes your apps stand out. Keep it concise and engaging, highlighting what makes you unique.
- Website Address: Include a link to your website where users can learn more about you, and your development process, and potentially find other apps you’ve created.
Visuals:
- Developer Icon: Choose a high-quality icon that represents you or your studio. This could be your logo, a mascot, or another visually appealing image that reflects your brand identity. (JPEG or 24-bit PNG (not transparent), 512 px by 512 px, Up to 1 MB)
- Header Image: This is the banner image at the top of your Developer’s Page. Use a captivating image that showcases your most popular app or the overall theme of your app portfolio. Keep the image size and format requirements in mind. (JPEG or 24-bit PNG (not transparent), 4096 px by 2304 px, Up to 1 MB)
- Featured App: You can choose one of your apps to be prominently displayed on your Developer’s Page. This is a great opportunity to highlight your most successful app or one you want to promote.
Additional Tips:
- Keep it Up-to-Date: Make sure your contact information, website link, and promotional text are current.
- Maintain a Consistent Brand Identity: Ensure the visuals on your Developer’s Page (icons, images) align with the overall branding of your apps and website.
Creating a Developer’s Page is a simple process within your Google Play Console. While it’s not essential for publishing an app to Google Play, it’s a fantastic way to establish yourself as a serious app developer and attract more users in the long run.
Step 4: Study Google Developer Policies
Before you hit publish, it’s crucial to take some time to understand Google Play’s Developer Policies. These are the rules of the road that ensure the Play Store offers high-quality apps and a safe environment for users. Taking a moment to familiarize yourself with these policies can save you time and frustration down the line.
Here’s why understanding the policies is important:
- Avoids Rejection: Google reviews all apps before they go live, and apps that violate the Play Store’s policies will be rejected. Knowing the guidelines upfront helps you ensure your app meets all the requirements for publication.
- Protects Users: The policies are in place to keep users safe from harmful or misleading content. By following them, you’re contributing to a positive user experience on the Play Store.
- Builds Trust: When your app adheres to the policies, it shows Google and users that you’re a responsible developer who cares about quality and user safety.
So, where do you find these policies? Google actually makes them readily available online. They cover a wide range of topics, but some key areas to focus on include:
- Restricted Content: This includes things like malware, spam, and content that exploits children.
- User Data Privacy: Be clear about how your app collects and uses user data.
- In-App Purchase: Make sure your billing practices are transparent and fair.
By spending some time understanding Google Play’s Developer Policies, you’ll be well on your way to a smooth and successful app launch.
Step 5: Technical Requirements
Now that you’ve familiarized yourself with the policies, let’s talk about some technical aspects. There are a few technical requirements your app needs to meet to be compatible with the Google Play Store. Think of it as a final inspection before your app goes live!
Here’s a breakdown of the key technical things to ensure before uploading your app:
- Unique Application ID: Every app needs a unique identifier, kind of like a social security number for apps. This ensures no other app has the same identity, avoiding any confusion. You set this ID in your app’s code.
- Signed App Bundle: Imagine your app as a document – it needs a signature to verify its authenticity. This signature, created using a special developer certificate, lets Google Play know your app comes from you, a trusted source. You can’t regenerate this certificate, so treat it like a digital fingerprint!
- App Size: New apps and app updates must target Android 11 (API level 30) or higher; except for Wear OS apps, which must target API level 28. For older devices, it’s 50MB. If your app is bigger, don’t worry! There are ways to split it into smaller parts for upload.
- File Format: New apps will need to be published with the Android App Bundle format or use Play Asset Delivery or Play Feature Delivery to deliver assets or features that exceed a download size of 200 MB. Expansion files (OBBs) will no longer be supported for new apps.
These are just some of the technical requirements to keep in mind. By following these guidelines, you’ll be setting your app up for a successful launch on the Play Store.
Step 6: Creating the App on the Google Play Console
Prerequisites
Before you upload app to Google Play Store, there are a few documents you’ll need to have ready. These documents help Google understand your app and ensure it meets their quality standards. Think of them as a checklist to make sure everything is in order for a smooth launch.
Here’s what you’ll typically need to prepare:
- Privacy Policy: This is a legal document that explains how your app collects, uses, and shares user data. There are many resources online to help you create a privacy policy, and Google even offers a template to get you started.
- Screenshots and Feature Graphic: These are high-quality images that showcase your app’s interface and features. They’re like your app’s movie posters, so make sure they’re visually appealing and capture the essence of what your app does.
- Other Supporting Assets: Depending on your app, you might also need things like video trailers or promotional text descriptions. These are great bonus materials to give users a richer understanding of your app.
Having all these documents prepared beforehand will save you time and ensure a smoother submission process when it’s time to upload app to Google Play Store.
Now that you’ve prepared your documents and ensured your app meets Google’s standards, it’s time to create your app listing on the Google Play Console. This is where you’ll provide all the information users will see about your app on the Play Store.
Here’s how to create a new app listing for your app:
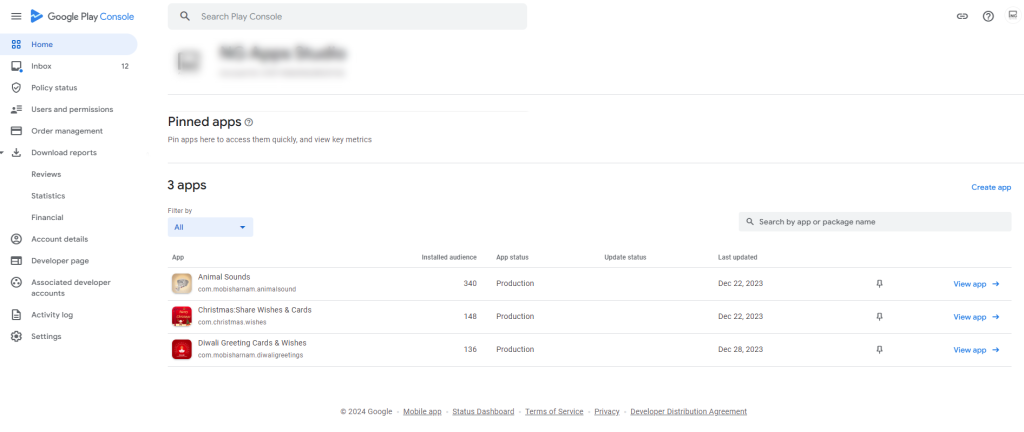
- Log in to your Google Play Console using the developer account you created earlier (https://play.google.com/console/).
- On the main dashboard, click on “All apps” and then “Create app.”
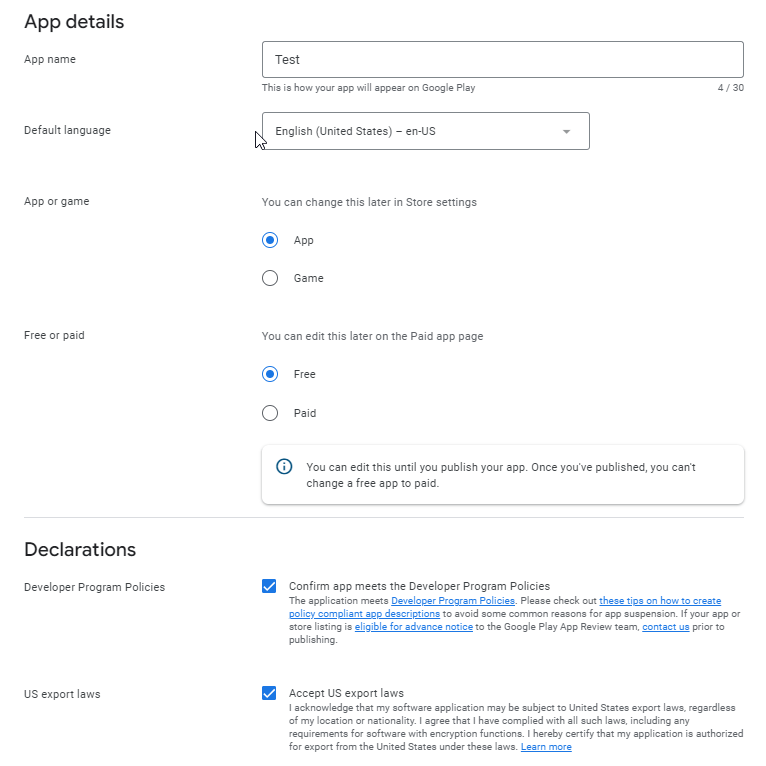
- Give your app a catchy and descriptive title – this is what users will see in the Play Store!
- Select the category that best fits your app (e.g., Games, Education, Productivity).
- Choose whether your app is free or paid.
- Provide a default language for your app listing and any additional languages you plan to support.
- Review and accept the Developer Program Policies and any other agreements.
Once you’ve filled out this basic information, you’ve created a new app listing on the Play Console. But that’s just the first step! The next step focuses on crafting a compelling store listing that will entice users to download your app.
Step 7: Setting up Your App’s Details
We’ve covered a lot of ground so far, and now it’s time to delve into the specifics of your app within the Google Play Console. This step involves providing Google with detailed information about your app to ensure it gets categorized and displayed correctly on the Play Store. Here’s a breakdown of the key areas to configure:
Set Privacy Policy
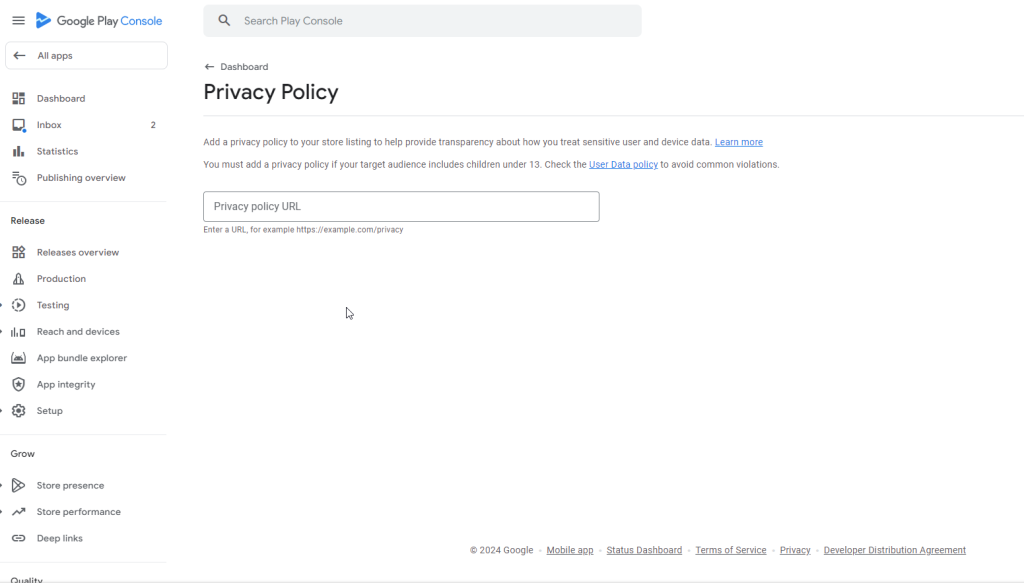
Remember that privacy policy you prepared earlier? Here’s where you link it to your app listing. This informs users about how your app collects, uses, and shares data.
App Access
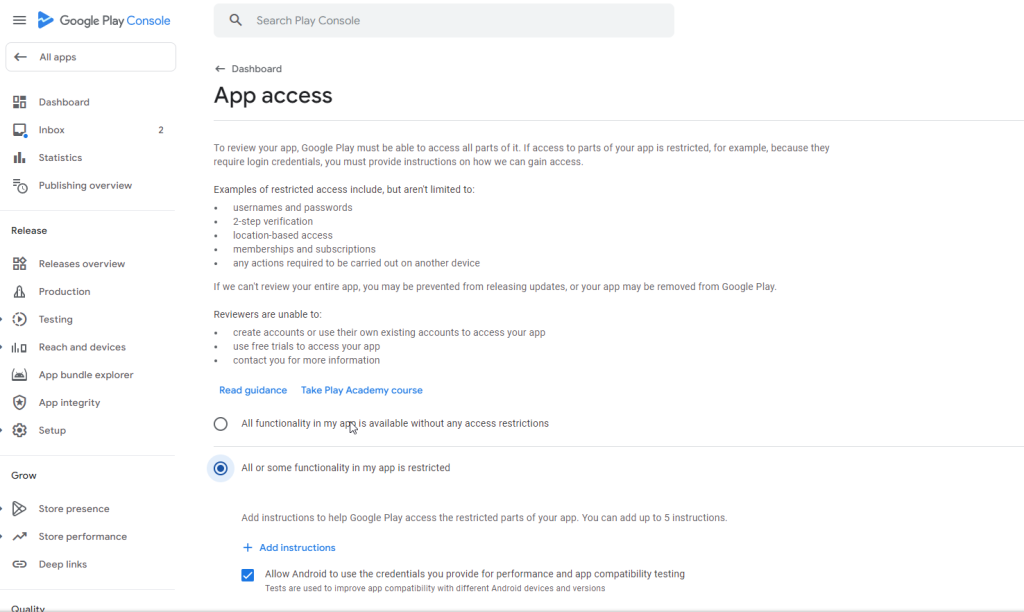
The App Access section informs Google Play reviewers about any login functionality within your app and the credentials needed to test it. This helps them understand your app’s features and conduct a smoother review process.
Ads
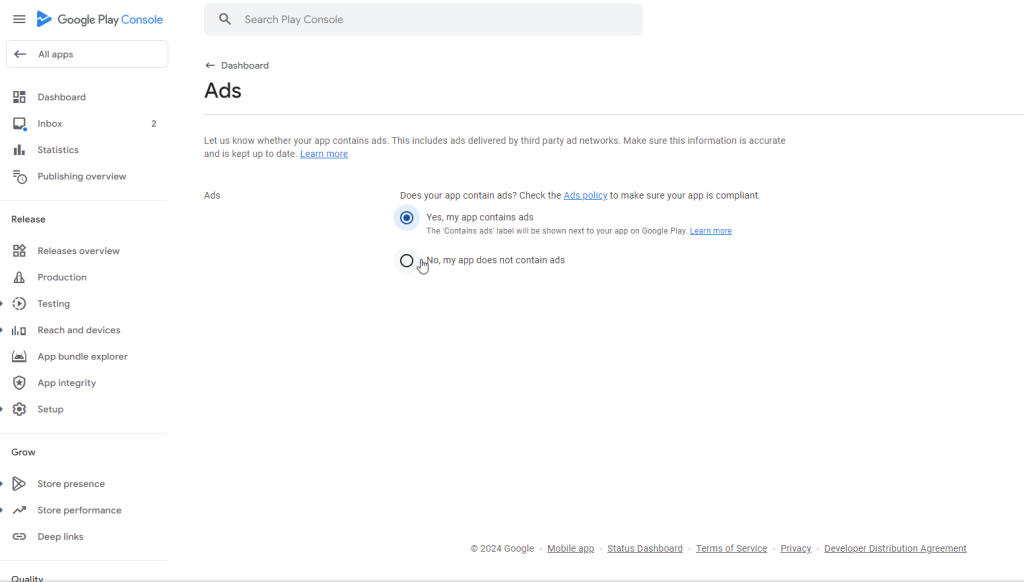
If you plan to show ads within your app, you’ll configure your ad settings here. Google Play offers various ad formats, so you can choose the ones that best suit your app and target audience.
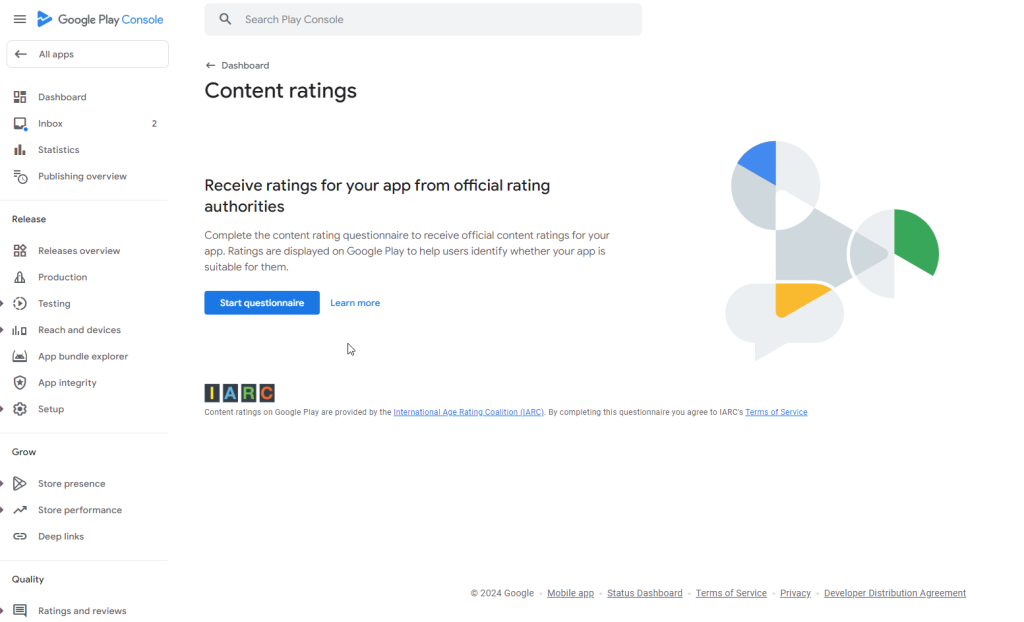
Content Rating
Google Play uses a questionnaire to determine the appropriate content rating for your app. The questionnaire asks you a series of questions about the content, features, and functionalities within your app. Based on your honest answers, Google Play assigns a rating.
Here’s why content rating is important:
- Transparency for Users: The content rating lets users know if your app contains things like violence, mature themes, or gambling elements. This helps them make informed choices about what apps to download.
Age-appropriateness: The Play Store restricts access to certain apps based on their content rating. For example, apps with a “Mature 17+” rating might not be available to users under the age of 17.
Target Audience
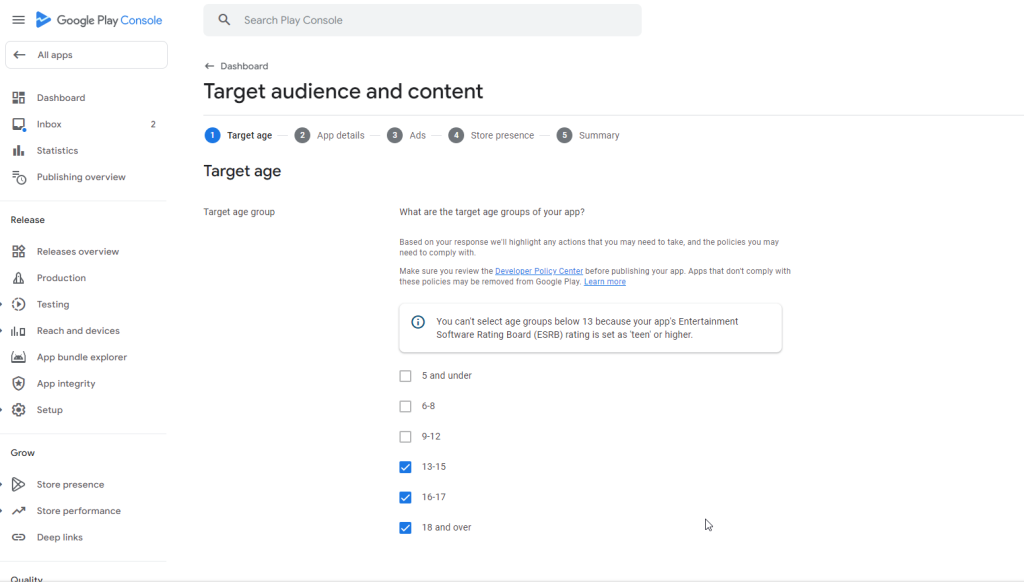
If your app targets children, there are specific requirements you’ll need to comply with. Google Play provides detailed information to ensure your app is safe and appropriate for younger users.
News Apps
News apps have a dedicated content rating process to ensure transparency and user trust. If your app delivers news content, you’ll follow specific guidelines for setting up your listing.
Data Safety Section
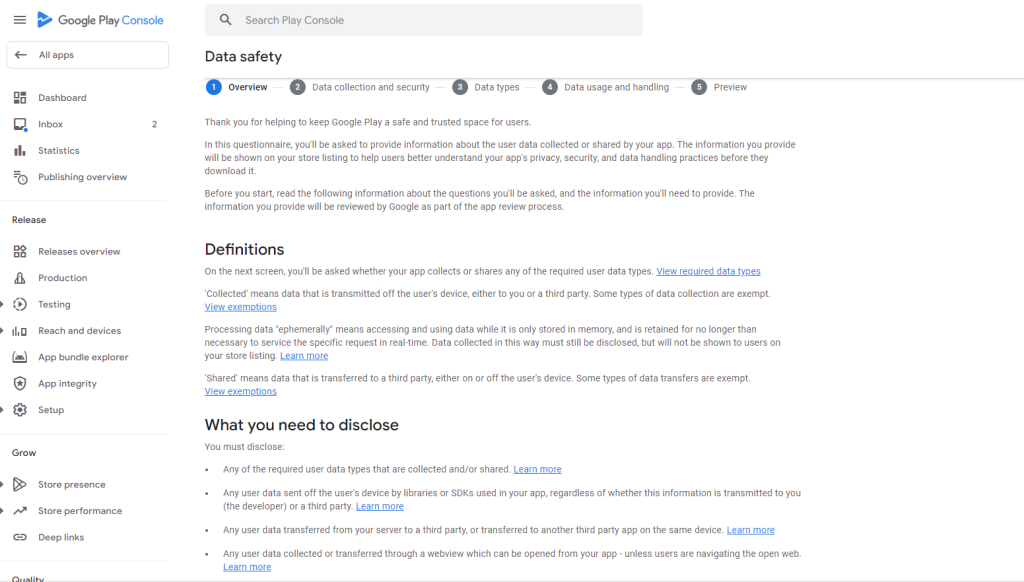
This section allows you to provide users with more details about your app’s data security practices. It can be a great way to build trust and transparency with users who value data privacy.
Government Apps and Financial Features
If your app falls into these categories, there might be additional requirements or verifications needed before publishing. Be sure to check Google Play’s documentation for specific guidance.
Health and Fitness Apps
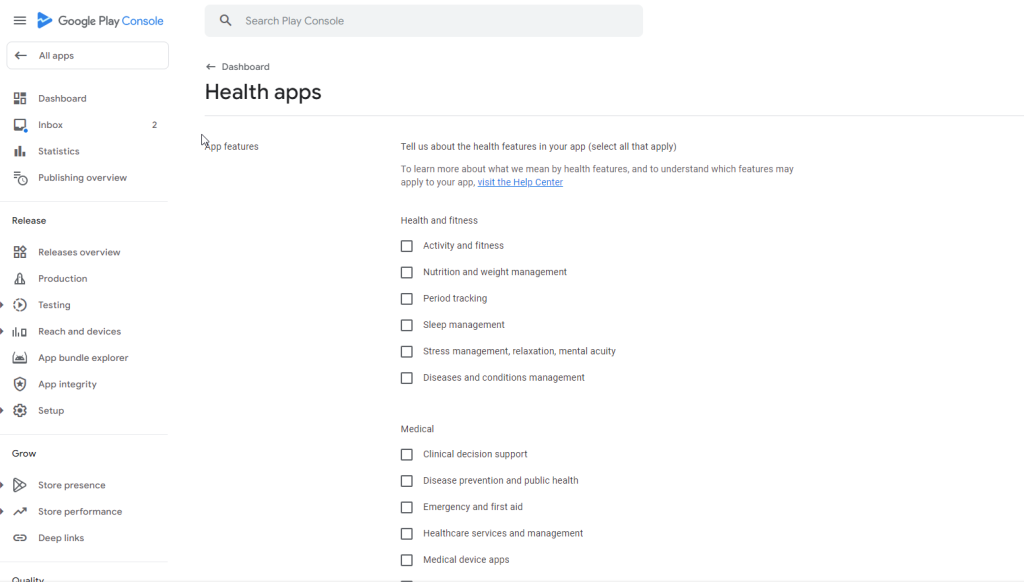
Similar to government and financial apps, health apps may have additional review processes to ensure they meet specific quality standards.
Select an App Category and Provide Contact Details
Categorize your app correctly to help users find it easily on the Play Store. Also, include your contact information so users can reach you with questions or feedback.
By carefully configuring these settings, you’ll provide Google Play with all the necessary information to review your app and ensure it meets their standards.
Step 8: Main Store Listing
Now that you have a new app listing on the Google Play Console, it’s time to create the shop window for your app – the Store Listing. This is your chance to convince users why your app is awesome and deserves a spot on their device. Here, we’ll break down the key elements of a winning store listing, including character limitations and image size requirements:
Listing Assets:
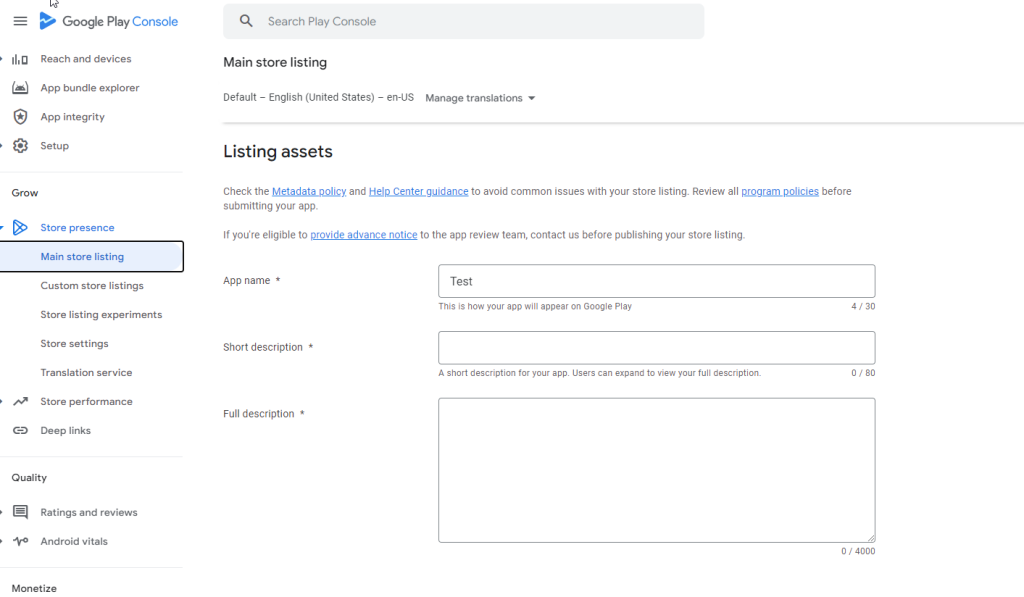
- App Name (30 characters maximum): Keep it short, catchy, and relevant to your app’s function. Avoid using excessive punctuation or special characters.
- Short Description (80 characters maximum): This is a one-liner that appears below your app icon in search results. Think of it as a quick elevator pitch for your app – make it count! Highlight the key benefit or unique feature that will grab users’ attention.
- Full Description (4,000 characters maximum): Here’s where you can delve deeper into your app’s features and benefits. Explain what your app does, how it solves a problem, and why it’s unique. Use clear and concise language, and highlight the key features that will resonate with your target audience. Break up the text with bullet points and short paragraphs for readability.
Graphics:
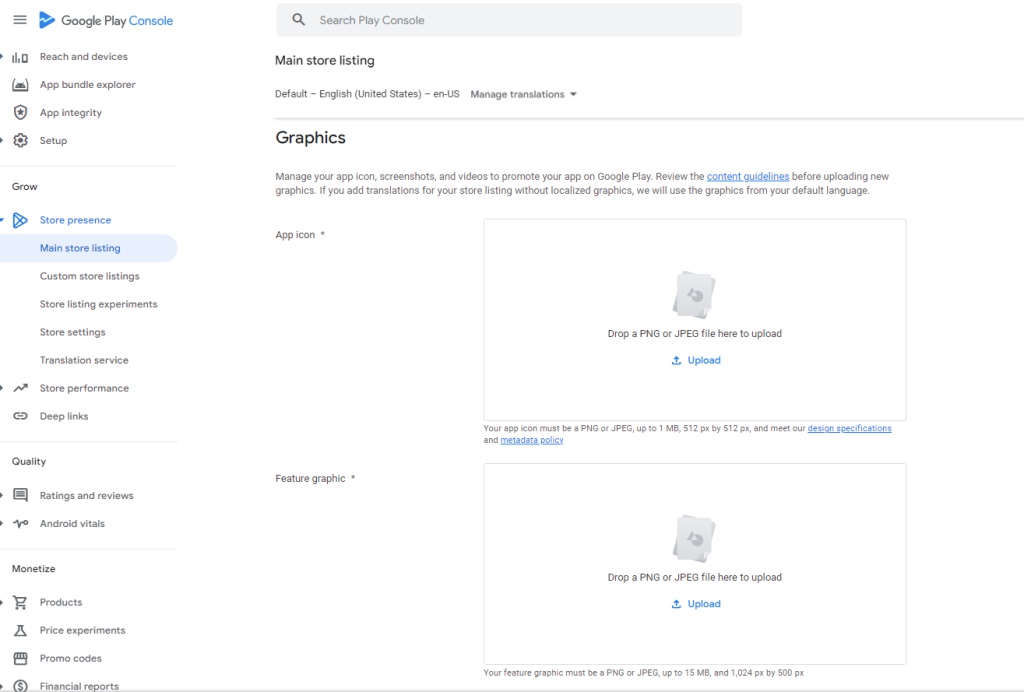
- App Icon (minimum 512 x 512 pixels, maximum 1024 x 1024 pixels): This is the first impression for your app, so make it visually appealing and memorable. It should be simple, high-resolution, and reflect the overall style of your app. Google Play recommends using a variety of icon shapes and backgrounds to ensure your icon looks good on different devices.
- Feature Graphic (1024 x 500 pixels): This is a larger image that appears at the top of your app listing. Use a screenshot or a custom graphic that showcases your app’s main features in action. High-quality visuals are essential here!
- Video (Optional, maximum 2 minutes, 1080p resolution): A short, engaging video trailer can be a fantastic way to grab users’ attention and give them a dynamic overview of your app’s features. Keep the video concise and focus on the most exciting aspects of your app.
Screenshots:
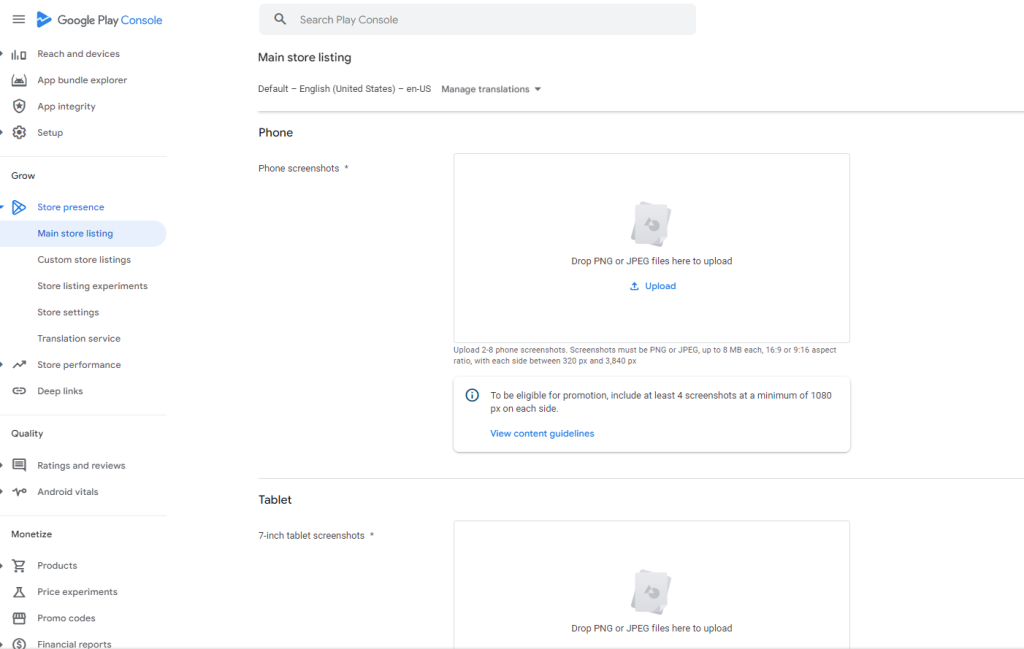
- Phone Screenshots (at least 2 screenshots, 1080 x 1920 pixels and 360 x 640 pixels): Provide high-quality screenshots that showcase your app’s interface and key functionalities on a phone screen. Use a variety of screenshots to capture different aspects of your app.
- Tablet Screenshots (Optional, 800 x 1280 pixels): If your app is designed for tablets, include screenshots that demonstrate how it adapts to a larger screen size.
- Chromebook Screenshots (Optional, 1024 x 768 pixels): If your app is compatible with Chromebooks, you can include screenshots specifically tailored to that platform.
By investing time and effort into your store listing, you’ll create a powerful marketing tool that attracts users and increases the chances of your app’s success.
Step 9: Pricing Your App
If you haven’t already decided whether your app will be free or paid, this step is for you! The Play Store offers a variety of pricing options, allowing you to choose the monetization strategy that best suits your app and target audience.
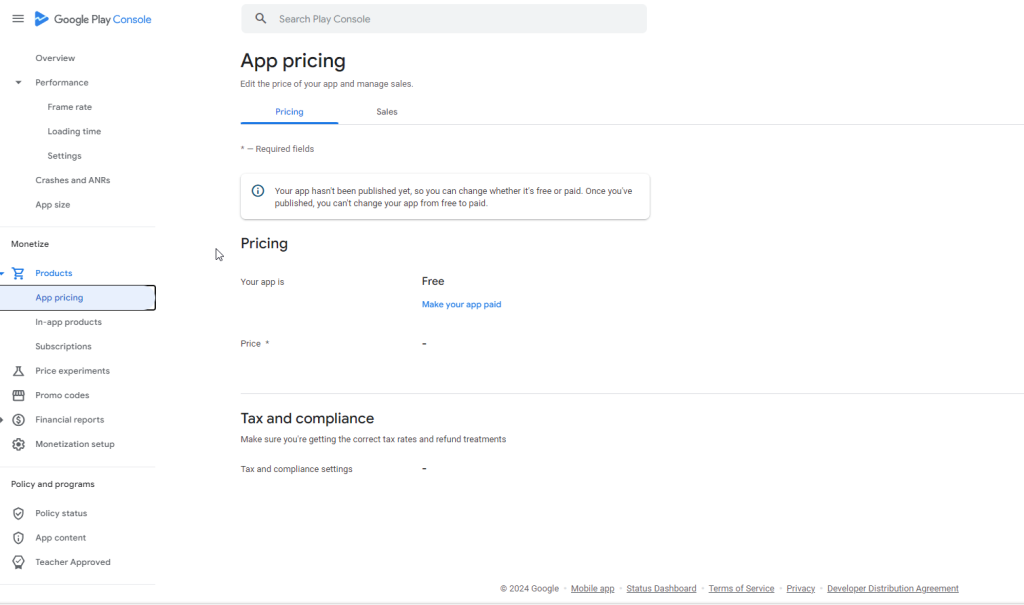
Here’s a breakdown of the most common pricing models:
- Free: This is a popular option, especially for games or introductory apps. You can still generate revenue through in-app purchases or advertising within the free app.
- Paid: Set a fixed price for your app upfront. This model works well for premium apps that offer unique features or functionalities.
- Freemium: Offer a basic version of your app for free, with the option to upgrade to a premium version with additional features through in-app purchases.
Here are some things to consider when choosing a pricing strategy:
- Target Audience: Who are you developing this app for? Are they likely to be willing to pay for an app, or is a freemium model more suitable?
- App Value: Does your app offer enough value and features to justify a paid price tag?
- Competition: Research similar apps in the Play Store to see what pricing models they use.
Ultimately, the best pricing strategy depends on your specific app and goals. Don’t be afraid to experiment and adjust your pricing over time to see what resonates most with your users.
In-App Purchases
If you decide to offer in-app purchases within your app, be sure to clearly communicate what users are paying for and avoid any misleading practices. Google Play has specific guidelines for in-app purchases, so be sure to review them before implementing this feature.
Step 10: Upload Your APK and Get Ready for Review
Now that you’ve navigated all the preparation steps, it’s finally time to upload your app and submit it for review! This is the moment your creation goes before the Google Play tastemakers (well, reviewers) to see if it meets their standards and is ready for the world.
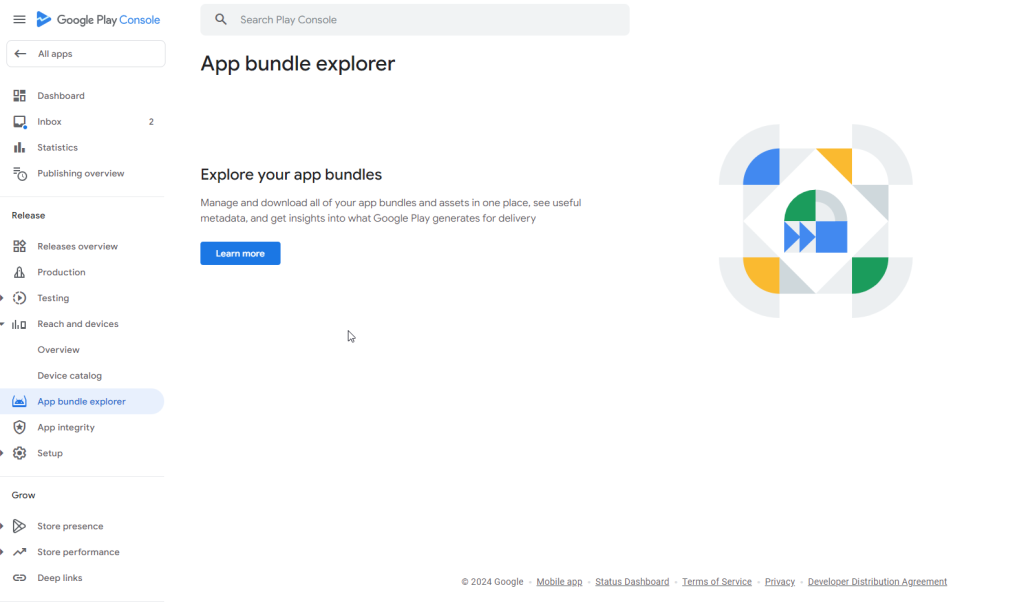
Here’s what to expect in this final step:
- Upload Your App Bundle/APK: The Google Play Console allows you to upload your app in either Android App Bundle (AAB) or APK format. The AAB format is generally recommended as it offers better optimization and flexibility.
- Review Your App Listing: Double-check all the information in your store listing, including screenshots, descriptions, and pricing (if applicable). Make sure everything is polished and error-free.
- Submit for Review: Once you’re confident everything is in order, click the “submit for review” button. This initiates Google Play’s review process.
The Google Play Review Process
The Google Play review process typically takes a few days, although it can sometimes take longer depending on the complexity of your app. During this time, Google will review your app to ensure it:
- Meets their technical requirements.
- Adheres to their Developer Policy guidelines.
- Provides a high-quality user experience.
- Accurately reflects the information in your store listing.
What Happens After Review?
There are three possible outcomes after your app review:
- Approval: Congratulations! Your app has been approved and will be published on the Play Store within the next few hours.
- Iterations Required: The reviewers might identify some minor issues that need to be addressed before your app can be published. They’ll provide you with feedback and instructions on how to fix these issues. You can then make the changes, resubmit your app, and go through another review process.
- Rejection: In rare cases, Google Play might reject your app if it has major violations of their policies or doesn’t meet their quality standards. They’ll provide you with detailed feedback on the reasons for rejection. You can then address the issues and resubmit your app for review.
Stay Positive and Keep Learning!
The review process can sometimes feel nerve-wracking, but it’s important to remember that Google Play wants high-quality apps on their platform. By following the guidelines and best practices outlined in this blog post, you’ll increase your chances of a smooth review and successful launch.
Post-Launch Optimization
Launching your app is just the first step. To keep users engaged and achieve sustainable growth, ongoing optimization is crucial:
1. Track Your App’s Performance:

Leverage Google Play Console’s analytics dashboard to monitor key metrics like downloads, installs, user engagement (active sessions, retention rates), and in-app purchases (if applicable). This data is like your app’s health report, revealing areas for improvement and optimization.
2. Respond to User Reviews:
Actively engage with user feedback, addressing both positive and negative reviews promptly and professionally. Thanking positive feedback shows appreciation while addressing negative feedback demonstrates responsiveness and a commitment to improvement. Remember, reviews are like your app’s public reputation, so manage them carefully.
3. Keep Your App Updated:
Regularly release updates to fix bugs, introduce new features like AI chatbot, and enhance performance. Think of updates as fine-tuning your app from its architecture to ensure a smooth and enjoyable user experience.
4. Master App Store Optimization (ASO):
Optimize your app listing with relevant keywords, high-quality screenshots, and a compelling description to improve search ranking on the Google Play Store. This is like making your app store storefront attractive and easy to discover for potential users.
5. Promote Your App:
Utilize various marketing channels to reach new users. Consider social media promotion, collaborating with app review websites, or even paid advertising campaigns. Remember, promoting your app is like spreading the word about your creation to attract a wider audience.
By consistently tracking performance, engaging with users, and actively optimizing your app, you can ensure your app thrives in the competitive Play Store landscape.
Getting Featured on the Play Store
While not guaranteed, getting featured on the Play Store’s “Featured,” “Top Apps,” or other curated sections can significantly boost your app’s visibility and downloads. Here’s what you need to know:
1. The Spotlight’s Benefits:
- Featured placements put your app in front of millions of potential users, propelling it up the discovery ladder. Imagine landing your app on the Play Store’s prime real estate!
- Being recognized by Google Play editors adds a stamp of approval, attracting users who trust the platform’s recommendations. Think of it as earning a gold star from a trusted reviewer.
- Increased visibility often translates to more downloads, positive reviews, and user engagement, fueling organic growth for your app.
2. Optimizing for Visibility:
Ensure your app delivers high-quality functionality, a polished user experience, and positive user ratings to catch the editors’ eye. Think of it as making your app technically sound and user-friendly.
Craft an engaging app description, utilize relevant keywords, and showcase high-quality screenshots to grab attention and accurately represent your app’s value. Imagine creating an eye-catching storefront that entices users to click.
Focus on optimizing app performance, addressing user feedback, and keeping your app updated to demonstrate its value and commitment to user satisfaction. Remember, a well-maintained app is more likely to shine.
Note:
Featuring is selective and based on various factors. While optimizing your app and listing increases your chances, it’s not a guaranteed path.
Focus on building a high-quality app with a strong value proposition for users, and the potential for featuring will naturally follow. Utilize other marketing and promotional channels to reach your target audience and build a strong user base, regardless of featuring status.
By understanding the benefits and optimizing your app, you can increase your chances of getting featured and unlock the potential for wider user engagement and growth.
Wrapping Up!
Congratulations! You’ve poured your time and creativity into developing an amazing Android app. Now it’s time to share it with the world by publishing an app to Google Play Store. This guide will walk you through the entire process, step-by-step, in a way that’s easy to understand.
Before you jump in, here’s a quick checklist of things to have ready:
- A finalized, polished app: Make sure your app is free of bugs and functions smoothly.
- Screenshots and graphics: High-quality visuals to showcase your app in the Play Store listing.
- Privacy Policy: A document explaining how your app collects and uses user data.
- A developer account: You’ll need this to access the Google Play Console, your app’s mission control centre.
- Merchant Account: If you plan on offering in-app purchases, you’ll need a way to process payments securely.
Now, let’s dive into the steps!
Step 1: Create a Developer Account (if you haven’t already)
This is your key to the Google Play Store. Sign up for a developer account using your existing Google account. There’s a one-time registration fee involved, but that’s it!
Step 2: Add a Merchant Account
If you plan on making money through in-app purchases or subscriptions, you’ll need to connect a Merchant Account to your developer profile. This is basically your online store linked to Google Play, allowing you to securely accept payments from users.
Step 3: Create a Developer’s Page
This is your app’s storefront on the Play Store. It’s a great way to showcase all your apps and build brand recognition with users. You can include your logo, a bio, and links to your website and social media.
Step 4: Study Google Developer Policies
Take some time to familiarize yourself with Google Play’s Developer Policies. These are the rules of the road that ensure the Play Store offers high-quality apps and a safe environment for users. Understanding these policies can save you time and frustration down the line.
Step 5: Technical Requirements
There are a few technical aspects your app needs to meet to be compatible with the Play Store. This includes things like target API level, screen compatibility, and performance optimization. Google provides detailed documentation to help you ensure your app meets all the technical specifications.
Step 6: Creating the App on the Google Play Console
Before you upload app to Google Play Store, you’ll need to gather some documents. These include your privacy policy, screenshots of your app interface, and any other relevant assets like feature graphics or video trailers. After gathering the required documents, now it’s time to head over to the Google Play Console and create a new app listing for your masterpiece! This is where you’ll provide basic information like your app’s title, category, and language support.
Step 7: Crafting a Compelling Store Listing
This is your chance to convince users why your app is awesome! Create a compelling store listing with a catchy title, a clear description, and high-quality screenshots and graphics.
Step 8: Content Rating
Before your app goes live, it needs to be rated for content. Google Play uses a questionnaire to determine the appropriate rating based on the content within your app. This helps users make informed decisions about what apps to download.
Step 9: Pricing Your App
Decide whether your app will be free, paid, or freemium (with a free basic version and in-app purchases for premium features). Consider your target audience and the value your app offers when making this decision.
Step 10: Upload Your APK and Submit for Review
Congratulations! You’re finally ready to upload your app and submit it for review. Google Play’s team will assess your app to ensure it meets its quality standards. Be patient during this process, and respond promptly to any communication from Google Play.
Bonus Tip: Beyond Launch
Publishing your app on Google Play Store is just the beginning! Here are some additional tips to ensure long-term success:
- Monitor app performance using Google Play Console’s analytics tools.
- Regularly update your app with new features and bug fixes.
- Engage with your users by responding to reviews and ratings.
By following these steps and embracing a continuous improvement mindset, you’ll be well on your way to establishing a thriving presence on the Google Play Store. Get ready to see your app downloaded and enjoyed by users worldwide!